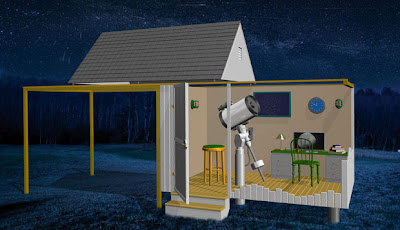
How to Become a Backyard Galileo (Minus the Church Trouble)
In the United States, about 250,000 amateurs watch the heavens—and many of them have made significant contributions to scienceThis article is a sample from DISCOVER's special Extreme Universe issue, available only on newsstands through March 22.
When Martin Ratcliffe pushes the roof off his $1,200 backyard observatory in Wichita, Kansas, the stars beckon and the human world slips away. “Viewing the sky places into a cosmic context my daily worries,” he says. Ratcliffe works at Sky-Skan, where he trains outside producers on planetarium software. In the United States, about 250,000 amateurs watch the heavens—and many of them have made significant contributions to science. Recently Australian amateur Anthony Wesley, using his homemade, 14.5-inch backyard scope, detected a new spot on Jupiter. Professionals quickly confirmed his observation, which turned out to be a scar from impact with a massive object, probably a comet. Regardless of the cost of your setup, “the sky is free,” Ratcliffe says. And today’s GPS-equipped, computer-guided “prosumer” gear makes it easier than ever to do a professional-caliber job on an amateur’s budget.
If you are just getting started, keeping it simple increases the odds that you will enjoy the experience and continue with it. There are refractors, reflectors, and compound telescopes. Ratcliffe suggests first trying a refractor like the kind Galileo used to discover the large moons of Jupiter. You can build a Galileoscope with a 20-inch tube, 2-inch-wide lens, and 50-power eyepiece in five minutes, using $20 worth of equipment. Feeling more ambitious? Try a Dobsonian telescope, a reflector on a simple swivel mount. Later, you can upgrade to the higher-end, automated telescopes that orient themselves by looking for reference stars and determining their location via GPS. Then you can tell the computer what you want to see, and, after an initial alignment by hand, it will do the pointing for you. Some old-timers frown on letting a computer do the work, but Ratcliffe is a fan. “It opens up astronomy to the backyard viewer,” he says.
Some specific brands to consider:
BEGINNER: Orion SkyQuest XT4.5, 4½", $229;
Edmund Scientific AstroScan, 4¼", $229;
Celestron NexStar SLT, 4", $500.
INTERMEDIATE: Orion SkyQuest XT10, 10", $500;
Meade ETX-125 AT, 5", $999;
Celestron NexStar 8SE, 8", $1,199.
ADVANCED: Meade LX-90 SC, 10", $2,399;
Celestron CPC 925 XLT, 9¼", $2,499;
Meade LX-200 ACF, 14", $6,999.
Now that you've built or bought a telescope, the fun's just started.Here's what you do next:
Wait for a clear night with low wind. The naked eye cannot penetrate fog or overcast; neither can a telescope. Choose your observing site carefully to avoid urban light pollution, which can reduce the number of visible stars by 95 percent, says Kelly Beatty, senior contributing editor to Sky & Telescope magazine.
Get a red-light lamp. Red light does not disturb your eyes’ adaptation to darkness, allowing you to read your star chart while remaining sensitive to the faint stars you are trying to observe.
Ignore the lure of high magnification. The diameter of the telescope, not the number of the magnification, dictates the quality of what you see. A larger lens or mirror allows you to see dimmer objects and to resolve finer detail. For professional-caliber stargazing, you will want a 14-inch reflector or compound (catadioptric) telescope, which can cost up to $10,000. Less than $1,000 will buy a fine 10-inch reflector with computer controls. But even a $200 refractor or reflector can provide stunning views of Saturn, the moon, and double stars.
Create a useful work area. You need a surface large enough to hold your equipment and a comfy chair that forestalls fatigue.
Get a good map of the night sky for the proper time of year. Find this month’s night-sky view at skyandtelescope.com. For more background information, pick up Chet Raymo’s 365 Starry Nights or Guy Ottewell’s annual Astronomical Calendar. Find a more detailed plot of the heavens in Sky & Telescope’s Pocket Sky Atlas or in the definitive SkyAtlas 2000.0. Always begin by gazing with just your naked eyes to get your bearings.
Keep it steady. You will want a sturdy pier (the pedestal that holds the telescope) for serious observing, to eliminate vibrations created by walking around. But for most casual viewing, a solid tripod is fine, provided it can handle the weight of your telescope.

No comments:
Post a Comment